
AI image inpainting has changed the way people fix and modify photos. Instead of manually cloning pixels, cutting objects out, or spending hours adjusting layers, you can select a specific part of an image and let AI recreate it based on your instructions.
Whether you want to remove an unwanted person, replace an object, repair an old photo, change a background, or fix an AI-generated image, inpainting can make the process much faster.
The best part is that you do not always need advanced Photoshop skills. With an AI inpainting tool, you can often upload an image, mark the area you want to change, describe the result, and generate a new version within seconds.
In this guide, you’ll learn what AI image inpainting is, how it works, how to write better prompts, how to create accurate masks, what tools can do, and how to fix common inpainting problems.
What Is AI Image Inpainting?
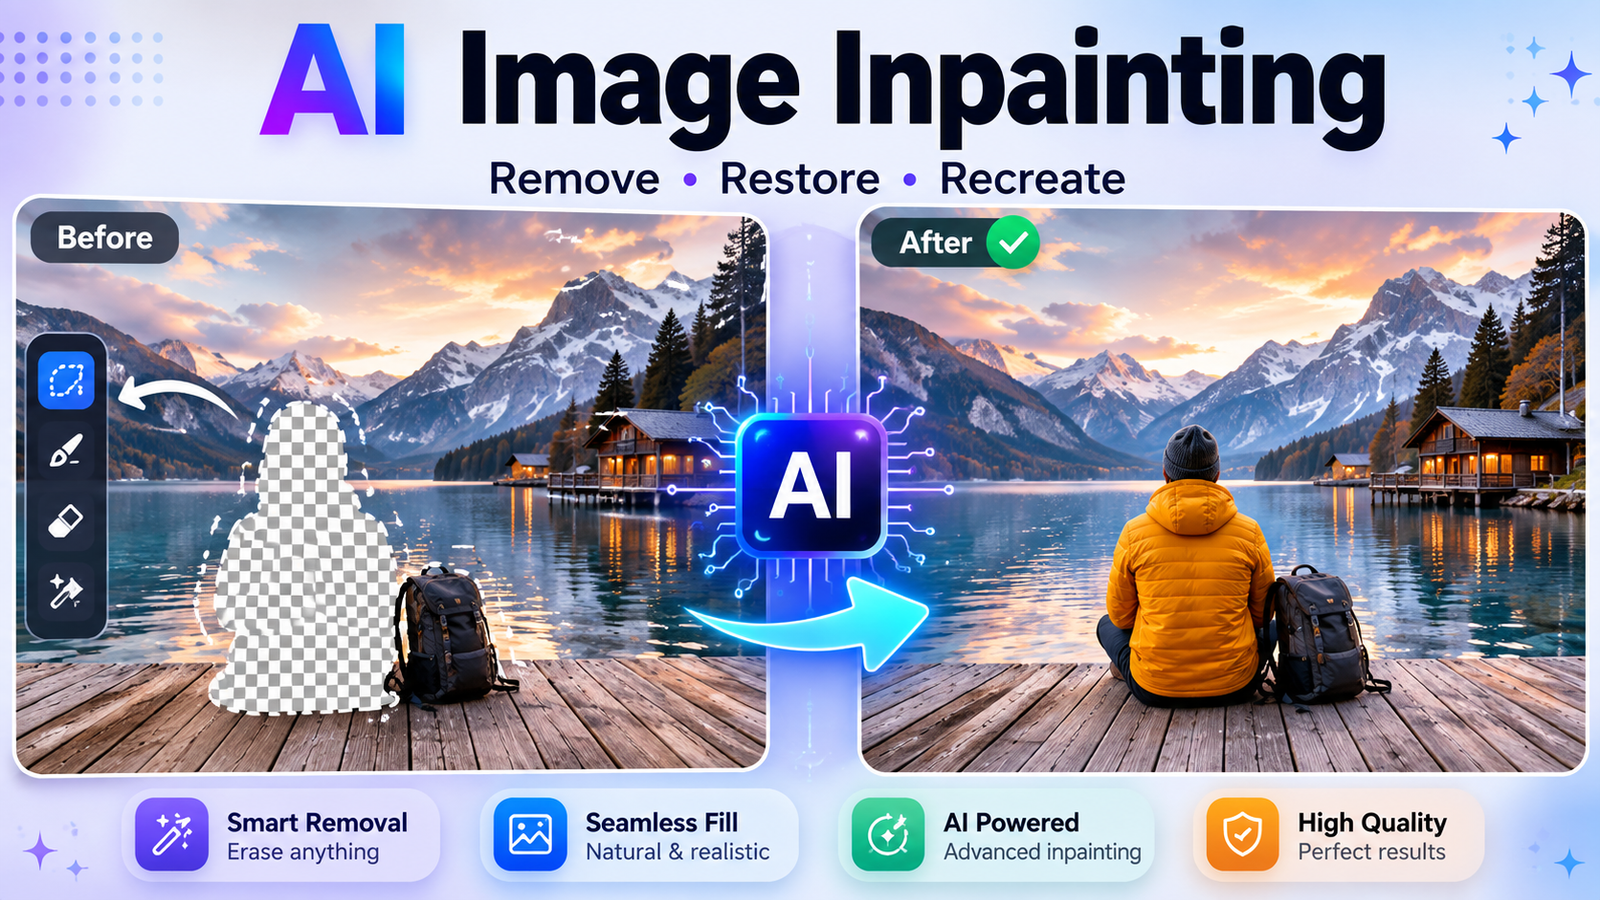
AI image inpainting is a technique that uses artificial intelligence to replace, repair, or modify a selected portion of an existing image. The user normally marks an area with a mask, then provides a prompt describing what should appear there.
The AI studies the surrounding parts of the image, including colors, textures, lighting, shapes, and perspective. It then generates new content designed to blend with the original scene.
For example, imagine you have a vacation photo with a stranger standing in the background. Instead of manually removing the person and rebuilding the background, you can mask the person and ask the AI to remove them and reconstruct the scenery naturally.
This makes AI image inpainting useful for both simple photo corrections and more creative image editing.
How Does AI Image Inpainting Work?
Although the process looks simple from the user’s perspective, several steps happen behind the scenes.
1. Upload the Original Image
You start with an existing image. A higher-quality source usually gives the AI more visual information to work with, especially when the selected area contains detailed textures or complicated objects.
2. Select the Area You Want to Change
The selected region is commonly called a mask. Depending on the tool, you may paint over an object with a brush, use a selection tool, or automatically detect the area.
The accuracy of this mask matters. A mask that is too small may leave unwanted pieces behind, while an oversized mask may cause the AI to modify parts of the image you wanted to preserve.
3. Describe the Desired Result
You then provide a text instruction, such as:
“Remove the selected person and naturally reconstruct the sidewalk and background, matching the existing lighting and perspective.”
A specific prompt generally gives the AI more useful direction than a vague instruction such as “fix this.”
4. AI Analyzes the Surrounding Image
The model considers the visible context around the masked region. It may use nearby colors, objects, textures, shadows, and spatial relationships to determine what belongs in the replacement area.
5. New Content Is Generated
The AI generates one or more versions of the selected area. Some tools provide several variations so you can choose the most convincing result.
6. The New Area Is Blended
The generated section is combined with the original image. Good inpainting should look like it belongs naturally in the scene rather than appearing as an obvious AI-generated patch.
What Can You Do With AI Image Inpainting?
The technology is useful for much more than removing objects. Here are some of the most practical applications.
Remove Unwanted Objects
You can remove people, signs, wires, furniture, vehicles, trash, or other distractions from an image.
For example, a photographer could remove a random person from a busy travel photograph without manually reconstructing the background.
Replace Objects
AI can replace one object with another. You could turn a plain chair into a modern wooden chair or replace an item on a table with a different product.
Change Backgrounds
Inpainting can modify selected portions of a background while keeping the main subject intact. This is useful for portraits, product photography, advertisements, and social media content.
Repair Old or Damaged Photos
AI inpainting can help reconstruct scratches, missing sections, stains, and damaged areas in old photographs. The result may not perfectly reproduce the original information, but it can create a visually consistent restoration.
Fix AI-Generated Image Errors
AI Image Inpainting generators sometimes create strange hands, distorted objects, inconsistent clothing, or other visual errors. Inpainting provides a convenient second pass for correcting those specific areas instead of regenerating the entire image.
Improve Product Images
E-commerce sellers can use inpainting to change backgrounds, remove distractions, or create alternative visual environments while keeping the main product relatively consistent.
How to Inpaint an Image With AI
Using an AI image inpainting tool is usually straightforward. The exact interface differs between platforms, but the general workflow is similar.
Step 1: Choose an AI Inpainting Tool
Look for a tool that offers accurate masking, prompt-based editing, multiple variations, and suitable image export options.
If you’re looking for AI image inpainting online, browser-based tools are convenient because you don’t need to install complex editing software.
Step 2: Upload Your Image
Choose the photo you want to edit. Use the highest-quality version available when possible.
Step 3: Create Your Mask
Paint over the exact area that needs modification. Include the complete object if you want to remove or replace it.
For example, when removing a person, include their body and any associated shadow if the shadow also needs to disappear.
Step 4: Write a Specific Prompt
Describe what should replace the selected area. Mention important details such as environment, material, lighting, perspective, and texture.
Step 5: Generate Several Results
Don’t assume the first generation will always be the best. If the tool provides multiple variations, compare them before choosing one.
Step 6: Inspect the Result
Zoom into the edited area and look for seams, strange textures, incorrect shadows, distorted shapes, or inconsistent lighting.
Step 7: Refine the Edit
If the first result isn’t convincing, adjust the mask or prompt and generate another version. Smaller, targeted edits often produce better results than trying to change a large area at once.
How to Create a Better Inpainting Mask
Masking is one of the most important skills for getting realistic results.
If the mask is too small, parts of the original object can remain visible. If it is too large, surrounding elements may change unexpectedly.
For object removal, slightly extending the mask beyond the object’s visible edges can help remove leftover pixels. If the object has a noticeable shadow, include the shadow in the editing area as well.
For small corrections, keep the mask tight. For example, if you’re fixing a tiny scratch on a wall, there is no reason to select half of the wall.
A useful rule is simple: mask everything you want changed, but avoid masking important details you want to keep.
Best AI Inpainting Prompts
A good prompt tells the AI what to change while providing enough context to produce a believable result.
A useful formula is:
Action + replacement + environment + appearance + lighting + perspective + details to preserve
Object Removal Prompt
“Remove the selected person and reconstruct the background naturally, matching the existing pavement, lighting, shadows, perspective, and surrounding buildings.”
Background Replacement Prompt
“Replace the selected background with a clean modern studio setting while keeping the subject, pose, proportions, lighting, and clothing unchanged.”
Product Photography Prompt
“Replace the selected background with a clean white studio surface. Preserve the exact product shape, color, proportions, label, edges, and natural shadow.”
Clothing Change Prompt
“Replace the selected shirt with a simple black button-up shirt while preserving the person’s body position, face, skin tone, lighting, and natural clothing folds.”
AI Artifact Repair Prompt
“Correct the distorted hand in the selected area. Create anatomically natural fingers that match the existing skin tone, lighting, pose, and perspective.”
Avoid overly complicated prompts when a simple instruction is enough. The goal is to give the model useful visual information rather than filling the prompt with unnecessary words.
AI Inpainting vs. Outpainting
Although the terms sound similar, they solve different problems.
| Feature | AI Inpainting | AI Outpainting |
| Main purpose | Modify an existing area | Expand the image |
| Works inside original canvas | Yes | Usually expands beyond it |
| Object removal | Excellent | Not the main purpose |
| Background replacement | Excellent | Limited |
| Extend image borders | No | Yes |
| Change selected objects | Yes | Not the primary use |
| For example, removing a person from a photo is an inpainting task. Extending a portrait from a square image into a wide banner is an outpainting task. |
AI Inpainting vs. Generative Fill
AI inpainting and generative fill are closely related concepts, and different platforms may use different terminology for similar workflows.
Both can allow users to select an area and generate new visual content based on context and instructions. However, the exact controls, models, and editing capabilities depend on the software.
For users, the important question is less about the label and more about whether the tool provides the masking, prompting, quality, and control needed for the specific edit.
AI Inpainting vs. Traditional Photo Editing
AI inpainting isn’t necessarily a replacement for every traditional editing technique. Instead, it provides another option when manual editing would take too much time.
| Method | Ease of Use | Speed | Control | Best For |
| AI Inpainting | High | Fast | High | Complex object and scene edits |
| Clone Stamp | Moderate | Slow | Very High | Precise manual corrections |
| Healing Brush | Moderate | Moderate | High | Small imperfections |
| Content-Aware Fill | Moderate | Fast | Moderate | Basic object removal |
| Traditional tools can provide more predictable pixel-level control, while AI inpainting is often better when the missing or replacement content needs to be generated rather than simply copied from another part of the image. |
How to Get More Realistic AI Inpainting Results
Getting a good result isn’t only about choosing a powerful model. Your source image, mask, prompt, and editing strategy all matter.
Start with a high-quality image and make the mask as accurate as possible. Describe the environment and lighting when those details affect the result.
If you’re replacing an object, mention its material and approximate appearance. If you’re repairing a background, describe the surrounding texture or structure.
Also, avoid changing too much in one generation. Smaller edits are easier to control and make it easier to identify what went wrong.
Generate several versions when possible. Then inspect the selected area at full size rather than judging only from a small thumbnail.
Common AI Inpainting Problems and Fixes
| Problem | Likely Cause | Solution |
| Original object is still visible | Mask is too small | Expand the mask slightly |
| Background changed unexpectedly | Mask is too large | Reduce the selected area |
| Visible seam | Hard or inaccurate mask | Refine or feather the edges |
| Lighting looks wrong | Prompt lacks lighting context | Describe existing lighting |
| Texture looks unnatural | Insufficient context | Mention surrounding material and texture |
| Shadows look strange | Shadow wasn’t considered | Include the shadow in the edit |
| Face changes unexpectedly | Too much of the face was selected | Use a smaller, targeted mask |
| Result looks artificial | Edit is too broad | Make smaller edits |
| One of the most common mistakes is expecting the AI to understand exactly what should remain untouched. If preserving a specific feature is important, keep it outside the mask and mention it in the prompt when appropriate. |
Why Does AI Inpainting Sometimes Look Fake?
Unnatural results usually come from a mismatch between the generated area and the original image.
The lighting might be different. The perspective may not line up. A replacement object could have the wrong texture or shadow. Sometimes the mask itself is the problem.
Another issue is asking the AI to make an extremely large change in a complicated scene. Instead of replacing half of an image at once, divide the task into smaller edits.
AI inpainting is powerful, but it is not guaranteed to reproduce every detail perfectly. Human review remains important, particularly for commercial images and professional work.
Is AI Image Inpainting Free?
Some platforms offer free AI image inpainting online, while others use credits, subscriptions, or paid plans. Free tools can be useful for occasional edits, but they may have limitations involving resolution, daily generations, watermarks, processing speed, or available models.
If you’re comparing a free option with a paid service, look beyond the word “free.” Consider the output quality, privacy policy, export resolution, commercial usage rights, and number of usable generations.
If you see an AI image inpainting APK, check the source carefully before installing it. Unofficial applications can create unnecessary security and privacy risks. For most users, a reputable web-based AI inpainting tool or official mobile app is a safer starting point.
Can You Use AI Image Inpainting on Mobile?
Yes. Many AI editing platforms offer browser-based experiences or mobile applications that allow users to perform image edits without a desktop computer.
An AI image inpainting app can be particularly useful for quick social media edits, travel photos, product images, and everyday photo corrections.
However, mobile interfaces can provide less precise masking than desktop software. For detailed professional work, a larger screen may make it easier to control the mask and inspect small artifacts.
Is AI Image Inpainting Safe?
Safety depends on the specific service you use. Before uploading private or commercially sensitive images, review the platform’s privacy policy and understand how uploaded files are handled.
Avoid uploading highly sensitive images to unfamiliar services simply because they advertise themselves as free or “no restrictions.” A trustworthy provider should clearly explain its data practices.
For commercial work, also check licensing and usage terms before publishing AI-edited images.
AI Image Inpainting Use-Case Examples
Example 1: Removing a Person
Mask the unwanted person and their shadow, then ask the AI to reconstruct the surrounding environment. Check the result for repeating patterns or unnatural background details.
Example 2: Product Background Editing
Select the existing background while keeping the product untouched. Ask the AI to create a clean studio environment and preserve the product’s exact appearance.
Example 3: Fixing an AI-Generated Hand
Use a small mask around the distorted hand rather than regenerating the entire person. Describe the desired natural hand position and preserve the existing pose and lighting.
Example 4: Removing a Background Distraction
Select the unwanted sign, wire, or object and ask the AI to reconstruct the surrounding wall, sky, road, or landscape.
These examples show why inpainting is often more useful as a targeted editing method than as a way to completely regenerate an image.
AI Image Inpainting Tips for Beginners
If you’re new to inpainting, remember these simple rules:
- Start with the best-quality source image available.
- Create a precise mask.
- Don’t select areas you want to preserve.
- Describe the desired result clearly.
- Mention lighting and perspective when relevant.
- Generate multiple variations.
- Check edges and shadows carefully.
- Use smaller edits for complicated images.
- Keep the original file before editing.
- Review AI-generated results before using them commercially.
Conclusion
AI image inpainting makes targeted photo editing much faster by allowing you to select a specific area and regenerate it with AI. It can remove unwanted objects, repair damaged areas, change backgrounds, modify products, and fix errors in AI-generated images.
The quality of the final result depends heavily on the mask, prompt, source image, and amount of editing. Precise selections, clear instructions, and small iterative changes usually produce more convincing results than broad edits.
Whether you’re looking for AI image inpainting online free, a professional AI inpainting tool, or a mobile solution, focus on output quality, editing control, privacy, and licensing rather than choosing a tool based on price alone.
Frequently Asked Questions
What is AI image inpainting?
AI image inpainting uses artificial intelligence to replace, repair, or modify selected areas of an existing image. You normally select an area with a mask and describe what you want the AI to generate there.
Can AI inpainting remove objects?
Yes. Removing unwanted people, signs, wires, furniture, and other distractions is one of the most common uses of AI inpainting. Results depend on the quality of the source image, mask, model, and surrounding scene.
Is AI image inpainting free?
Some tools provide free credits or limited free editing, while others require subscriptions or paid credits. Always check current pricing and usage limits before choosing a service.
What is the difference between inpainting and outpainting?
Inpainting modifies or replaces content inside an existing image. Outpainting expands an image beyond its original boundaries to create additional content around the existing scene.
How do I write a good AI inpainting prompt?
Describe what you want changed, what should replace it, and relevant details such as lighting, texture, perspective, and environment. Avoid vague instructions when the edit requires precision.
Why does my AI inpainting look unnatural?
Poor masking, incorrect lighting, mismatched perspective, weak prompts, and overly large edits can all cause unnatural results. Try refining the mask and making a smaller, more specific edit.
Can AI inpainting be used on mobile?
Yes. Depending on the service, you can use an AI inpainting app or a browser-based editor on a smartphone. Desktop tools may provide better control for detailed edits.
You May Also Read: Canva AI Headshot Generator
